Table of Contents
Protect Most Confidential SharePoint Online Sites
Adding to their container management capabilities, a feature for sensitivity labels demonstrate how to use authentication contexts with Entra ID conditional access policies to ensure secure access to information in SharePoint Online sites.
An authentication context is a way to tag information which needs special attention. First introduced in March 2021, authentication contexts are additional information required by a service provider before it grants access to a resource. Microsoft positions authentication contexts as a method to “target policies for data and actions within an app.” Put another way, authentication contexts allow organizations to apply more granular control to targeted data.
As implemented for sensitivity labels, authentication contexts link conditional access policies to let applications like SharePoint Online know that users must provide some extra information before they can access information in labelled sites. Let’s work through an example.
Define an Authentication Context
The first thing to do is to define an authentication context. In the Security section of the Entra ID admin center, open the Protection section, select Conditional Access and choose Authentication context. I created a context called Require MFA (Figure 1). The name is what you’ll see in apps like sensitivity labels. The ID for the context shown towards the bottom of the screen (c1 in this case) is an internal value written into the settings of sensitivity labels which use authentication contexts.

The Publish to apps checkbox is set, meaning that this authentication context is visible to apps like sensitivity labels and can be used by conditional access policies.
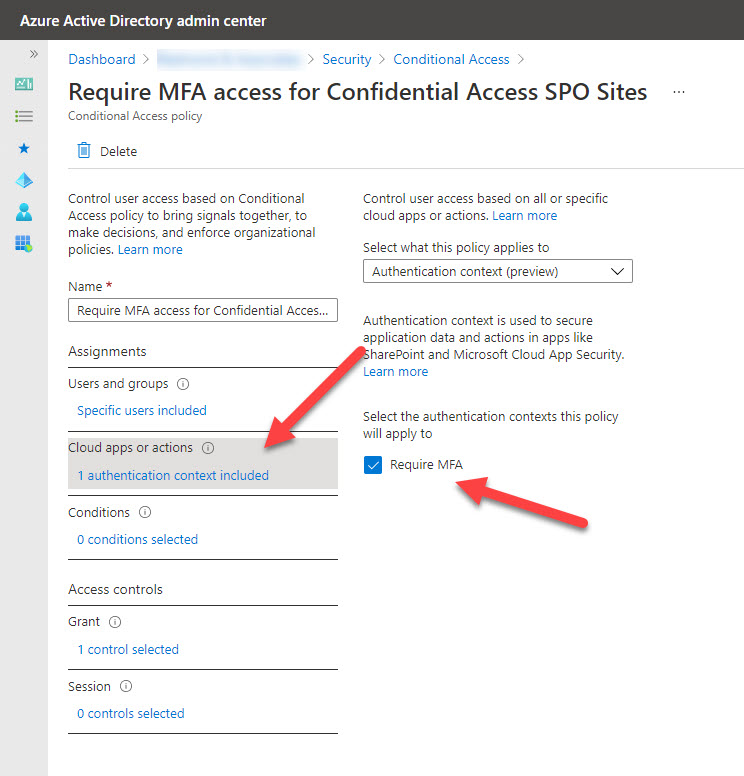
Create a Conditional Access Policy
The next step is to create a conditional access policy to use the authentication context to force multi-factor authentication. Conditional access policies can range from very simple to very complex. To prove that everything works as expected, I created a simple policy which blocks access to resources tagged with the authentication context unless the user authenticates with MFA. The new thing here is that you select the authentication context instead of apps (Figure 2). The requirement to use MFA is selected in the Grant section (not shown here).
Another easy thing to include in a conditional access policy to protect sensitive data is to include a terms of use (TOU) check to force users to read and acknowledge conditions governing access before they gain access to a site.
Updating the Sensitivity Label
To protect SharePoint Online sites with the conditional access policy, we configure a sensitivity label with the authentication context. Figure 3 shows the UI for sensitivity labels where we’ve selected the authentication context.

Any attempt to access a site with the label causes SharePoint Online to look at the label settings to see if an authentication context is specified. If one is found, SharePoint Online queries Entra ID to find which conditional access policy is associated with the authentication context and invokes the policy. In our example, attempts to access the site succeed if the user authenticates with MFA and fail otherwise.
Using PowerShell to Assign Authentication Contexts to Sites
The value of Sensitivity labels is that they make it easy to assign a set of different controls to containers, including conditional access policy protection to SharePoint Online sites. However, if your tenant doesn’t use sensitivity labels (yet), you can update sites with PowerShell. After you assign a label with an authentication context to a site, SharePoint Online updates two site settings:
- ConditionAccessPolicy: Holds the name of the conditional access policy protecting the site. When using an authentication context, this value is “AuthenticationContext.”
- AuthenticationContextName: Holds the name of the selected authentication context. As per Figure 1, it is “Require MFA.”
Check the values by running the Get-SPOSite cmdlet:
Get-SPOSite -Identity https://office365itpros.sharepoint.com/sites/SuperConfidential | ft con*, aut*

ConditionalAccessPolicy AuthenticationContextName
----------------------- -------------------------
  AuthenticationContext Require MFA
Now we know the properties to update, we can update other sites using the Set-SPOSite cmdlet:
Set-SPOSite -Identity https://office365itpros.sharepoint.com/sites/ProjectAjax -AuthenticationContextName "Require MFA" -ConditionalAccessPolicy "AuthenticationContext"
Testing the Block
To test that everything worked as expected, I used Teams. Many SharePoint sites created today are linked to Teams, so it seemed like a good test scenario. As expected, when I tried to access a site assigned the sensitivity label without using MFA, the Teams Files channel tab failed to connect and displayed an error (Figure 4).

Microsoft says that they are upgrading the Teams Files channel tab to prompt for MFA authentication when necessary. This will make access smoother and avoid users seeing the instant fail in the current experience.
When I tried to open the site using the SharePoint Online browser interface, it opened successfully. This puzzled me for a moment until I realized it was because the account had gone through a self-service password reset (SSPR) challenge and that the credentials gathered through that process satisfied the MFA requirement. This is because Microsoft now uses combined security information for MFA and SSPR (if your organization doesn’t use combined registration, you can enable it using these instructions). When I encountered the SSPR “your organization needs more information” challenge, it didn’t immediately make me think that MFA was involved, but it was!
To confirm that Entra ID enforces the conditional access policy for the site, you can check the Entra ID sign-in logs. Figure 5 shows that Entra ID invoked the policy because a user covered by the policy signed into SharePoint Online. The sign-in record doesn’t capture details of the site, but if only one sensitivity label uses the conditional access policy and you know who signed in, you can put two and two together to know what happened.

Increasing Control
Linking sensitivity labels with conditional access policies increases the granularity of control a label can exercise over SharePoint Online sites and increases the usefulness of sensitivity labels for container management. Multiple conditional access policies can use a context, which opens a bunch of different possibilities about how to control access in different circumstances.
Given the amount of confidential information stored in SharePoint Online, it’s nice to be able control conditional access so easily and a good example of how Microsoft is steadily building up the container management capabilities for sensitivity labels. Make sure that you have the necessary licenses before you use the feature!
Stay updated with developments across the Microsoft 365 ecosystem by subscribing to the Office 365 for IT Pros eBook. We do the research to make sure that our readers understand the technology.
This requires the tier 5 licences (E5, A5, etc). see https://docs.microsoft.com/en-US/sharepoint/authentication-context-example#requirements